This tutorial will explain how to create a registration form in ASP.NET using C# and a SQL Server database.
If you want to implement a simple sign-up functionality on your website, this tutorial will help you. Also, check out our latest tutorial on how to create an ASP.NET login page.
In this article…
- The logic behind the ASP.NET Registration form
- What happens when the code runs
- 1. Create an empty ASP.NET website.
- 2. Design the ASP.NET Registration form.
- 3. Add a SQL Server database and create a table.
- 4. Configure Web.config file.
- 5. Write the C# code to register the user.
- 6. Testing the ASP.NET signup form.
- Summary
The logic behind the ASP.NET Registration form
No rocket science is involved here – users will enter their details, such as email address, first name, last name, and other relevant information, on the registration form. After that, they will click a button to register on your site.
What happens when the code runs
Users will enter their details in the user registration form and hit the Register button. After that, a connection to the database will be established, and an SQL INSERT query will be executed to store all user inputs in the user details table.
Here is the breakdown of the complete process:
- Creating an empty ASP.NET website.
- Designing the user registration form.
- Adding an SQL database to the project, in which we will create a table to store user details.
- Configuring the web.config file.
- Code the backend of the user registration form.
- Try and test the application.
Now, let’s begin and create an ASP.NET registration form.
1. Create an empty ASP.NET website.
Step 1: Open Visual Studio, hit the Control+Shift+N shortcut, and select ASP.NET Empty Web Site from the dialog box, as shown below.

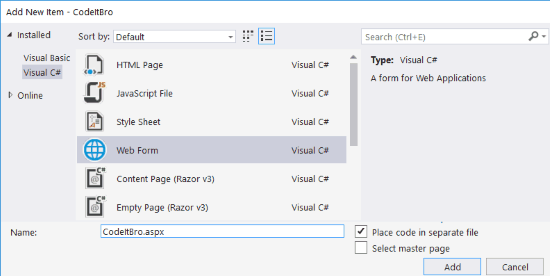
Step 2: After that, Visual Studio will create the project for you. Now, you need to add a web form to your project.
Press Control+Shift+A hotkey to open the Add New Item dialog box and select Web Form (Visual C#) from the options. Once done, click on the Add button.
2. Design the ASP.NET Registration form.
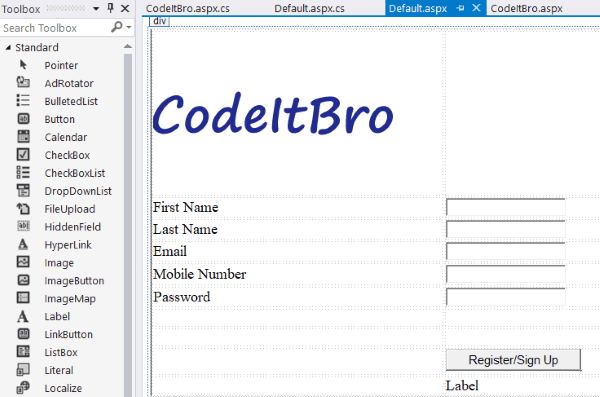
After adding the web form, switch to the Design tab and create a registration form, as shown in the screenshot above.
You have to drag and drop the elements from the Toolbox. If you feel lazy, download the code from the link provided at the end of this tutorial.
3. Add a SQL Server database and create a table.
Step 1: Hit the Control+Shift+A shortcut and select the SQL Server Database option. Afterward, Visual Studio will prompt you to create an App_Data folder within your project. Accept this prompt and then open the Server Explorer box. Now, you have added a database to your ASP.NET website.
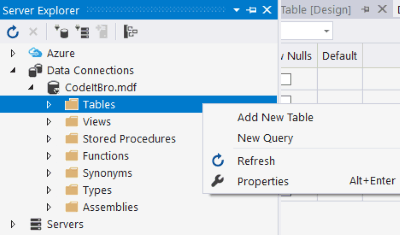
Step 2: From the Server Explorer, right-click the Tables and select the Add New Table option, as shown in the screenshot below.
Step 3: You will now see the table design interface, as shown below.
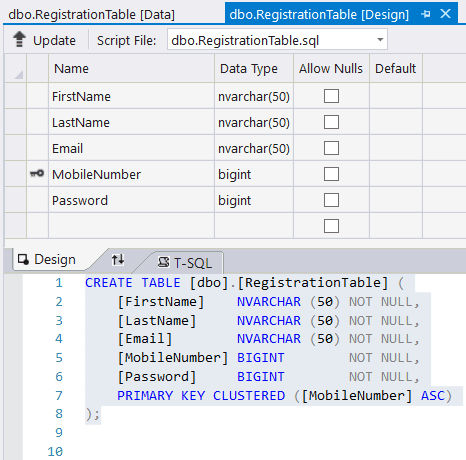
Specify the user attributes and the data types you want to store within the table. After that, click on the Update button.
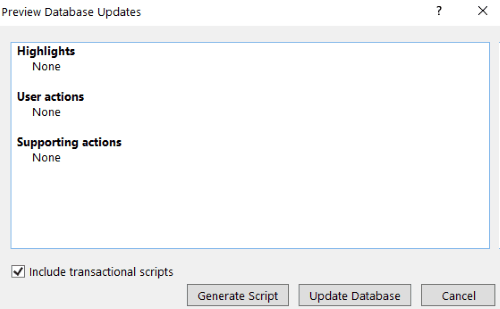
You will see the generated script to update the database, as shown below. Click on the Update Database button to create your table.
4. Configure Web.config file.
Open the Web.config file from the Solution Explorer and paste the connection string of your database in the following format within the <configuration></configuration> tags. Do not add the <connectionStrings> inside any other tag.
<connectionStrings>
<add name="dbconnection" connectionString="Paste your DB connection string here"/>
</connectionStrings>
To get the connectionString of your database, open Server Explorer and right-click on it. Select the Properties option.
Now, copy the Connection String of your database from the Properties box and paste it at the specified place in the code snippet.
Also Read: Backend Optimization in Custom WordPress Builds: Fixing a Slow WordPress Backend
5. Write the C# code to register the user.
Now, open the C# (aspx.cs) file of your ASP.NET registration form and paste the code into the button click event, as demonstrated in the code snippet below.
using System;
using System.Collections.Generic;
using System.Linq;
using System.Web;
using System.Web.UI;
using System.Web.UI.WebControls;
using System.Data;
using System.Data.SqlClient;
using System.Configuration;
public partial class _Default : System.Web.UI.Page
{
    protected void Page_Load(object sender, EventArgs e)
    {
    }
    protected void Register_Click(object sender, EventArgs e)
    {
        SqlConnection con = new SqlConnection(ConfigurationManager.ConnectionStrings["dbconnection"].ConnectionString);
        con.Open();
        SqlCommand cmd = new SqlCommand("insert into RegistrationTable values (@FirstName, @LastName, @Email, @MobileNumber, @Password)", con);
        cmd.Parameters.AddWithValue("FirstName", FnameTxt.Text);
        cmd.Parameters.AddWithValue("LastName", LnameTxt.Text);
        cmd.Parameters.AddWithValue("Email", Email.Text);
        cmd.Parameters.AddWithValue("MobileNumber", MobileNumber.Text);
        cmd.Parameters.AddWithValue("Password", Password.Text); cmd.ExecuteNonQuery();
        Label7.Visible = true;
        Label7.Text = "User registered successfully";
        FnameTxt.Text = "";
        LnameTxt.Text = "";
        Email.Text = "";
        MobileNumber.Text = "";
        Password.Text = "";
        FnameTxt.Focus();
    }
}
6. Testing the ASP.NET signup form.
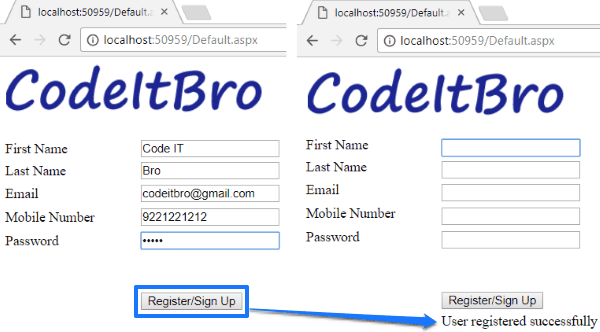
Debug your ASP.NET site and enter the details in the user registration form, as shown in the main screenshot. After that, click on the Register button. If you get any SQL Exception in Visual Studio, check out the table or the C# code.
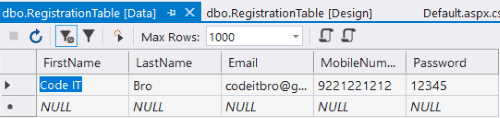
If everything goes perfectly, you will see this message: ‘User registered successfully.’ You can also verify whether the code worked by checking the user details table data, as shown below.
Summary
We hope this tutorial will help you easily create a simple ASP.NET registration form using C# and SQL Server databases.
In the future, we will create different versions of this tutorial or update it to make the ASP.NET Sign Up form smarter by applying JavaScript code to verify user input values, ensuring that no incorrect or dummy values are stored in the database.
If you encounter any issues, please don’t hesitate to leave a comment below.
Download the ASP.NET registration form code files from our GitHub repository.
Are you having trouble with GitHub? We have also hosted the complete project on Google Drive.
errors everywhere in cmd.Parameters.AddWithValue(“FirstName”, FnameTxt.Text); cmd.Parameters.AddWithValue(“LastName”, LnameTxt.Text); cmd.Parameters.AddWithValue(“Email”, Email.Text); cmd.Parameters.AddWithValue(“MobileNumber”, MobileNumber.Text); cmd.Parameters.AddWithValue(“Password”, Password.Text); cmd.ExecuteNonQuery();
“The name “FnameTxt.Text” does not exist in the current context”, either I did something wrong or this tutorial has a coding mistake somewhere