Most modern-day websites have login functionality to authenticate users. With the help of this functionality, website owners can provide unique features to specific users only.
For example, only registered users on Facebook can like or comment on other people’s posts. If you want to implement login functionality in your ASP.NET website, you have landed on the right page.
In this tutorial, you will learn how to create a simple ASP.NET login page using C# with a SQL database. Before proceeding with the tutorial, ensure you have set up MS Visual Studio.
I am using Visual Studio Ultimate 2011 for this tutorial. If you are using a different version, you may need to make adjustments to the Web.config file. If you encounter any issues, please comment, and I will assist you.
In this article…
Previously, we also covered how to create an ASP.NET registration page. You can check it out if you want to implement a user registration process.
Let’s get started and see how it is done.
How To Create a Login Page in ASP.NET Using C# with SQL Database
1. Creating an empty ASP.NET website
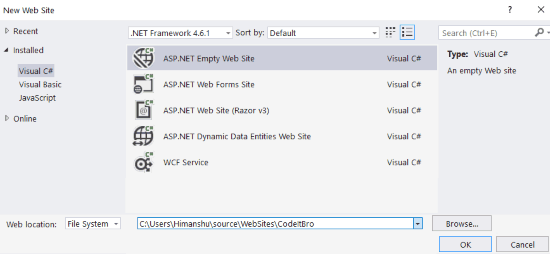
Open Visual Studio and create an empty ASP.NET website project. Use the shortcut Control+Shift+N to open the dialog box, as shown in the screenshot below.
Name your project and click on the OK button to continue.
After you click the OK button, Visual Studio will create the solution files and folders for your ASP.NET, including the Web.config file, which we will edit later to connect to our database.
2. Designing the Login web page
After your ASP.NET website project is up and running in Visual Studio, you need to add a web form to your project, which will serve as your login page.
Hit Control+Shift+A to quickly open the dialog box from where you can select to add a web form.
Once you add a web form, you can design a simple login page, as seen in the screenshot below. To make it more stylish, consider using CSS or a front-end framework.
I haven’t done any designing part to keep it simple for tutorial purposes. I recommend checking out Bootstrap, a front-end component library for building responsive, mobile-first projects on the Web.
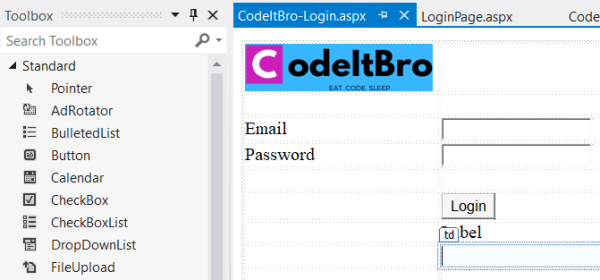
To design your login page, insert a table and drag and drop UI components from the Toolbox (Control + W) to the Design window.
<%@ Page Language="C#" AutoEventWireup="true" CodeBehind="CodeItBro-Login.aspx.cs" Inherits="CodeItBro.CodeItBro_Login" %>
<!DOCTYPE html>
<html xmlns="http://www.w3.org/1999/xhtml">
<head runat="server">
<title></title>
<style type="text/css">
.auto-style1 {
width: 100%;
}
.auto-style2 {
width: 216px;
}
</style>
</head>
<body>
<form id="form1" runat="server">
<table class="auto-style1">
<tr>
<td class="auto-style2">
<asp:Image ID="Image1" runat="server" ImageUrl="~/Images/codeitbro-blog-logo.png" Height="53px" Width="210px" />
</td>
</tr>
<tr>
<td class="auto-style2"> </td>
</tr>
<tr>
<td class="auto-style2">
<asp:Label ID="Label1" runat="server" Text="Email"></asp:Label>
</td>
<td>
<asp:TextBox ID="TextBox1" runat="server"></asp:TextBox>
</td>
</tr>
<tr>
<td class="auto-style2">
<asp:Label ID="Label2" runat="server" Text="Password"></asp:Label>
</td>
<td>
<asp:TextBox ID="TextBox2" runat="server" TextMode="Password"></asp:TextBox>
</td>
</tr>
<tr>
<td class="auto-style2"> </td>
</tr>
<tr>
<td class="auto-style2"> </td>
<td>
<asp:Button ID="Button1" runat="server" OnClick="Button1_Click" Text="Login" />
</td>
</tr>
<tr>
<td class="auto-style2"> </td>
<td>
<asp:Label ID="Label3" runat="server" Text="Label" Visible="False"></asp:Label>
</td>
</tr>
</table>
<div>
</div>
</form>
</body>
</html>
3. Creating a SQL database
After designing the login page, let’s create and add an SQL database to our project. To add an SQL database to your ASP.NET website, use the Control + Shift + A shortcut and select SQL database from the dialog box.
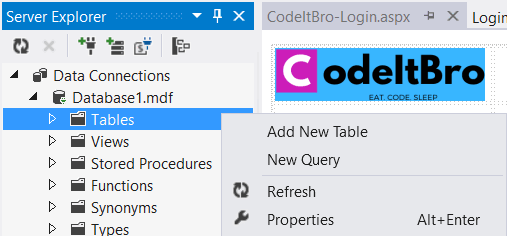
Visual Studio will display a prompt to create an app_data folder. Click on the OK button to add the SQL database. Now, you can see your SQL database from the Server Explorer toolbar, as shown in the screenshot below.
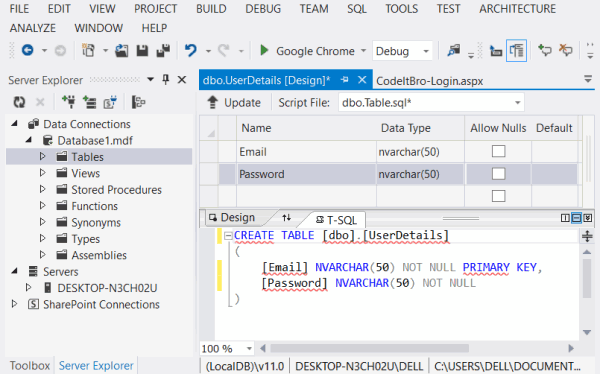
Now, let’s add a table, UserDetails, from where we will match the users’ credentials. To add the table, right-click on the “Tables” menu in the Server Explorer and select the “Add New Table” option.
After that, Visual Studio will open a tab where you can write an SQL query to create the table.
If you prefer not to write the SQL query, specify the table fields and data tables on the Table Design tab, as shown in the screenshot below.
Click the Update button, and Visual Studio will display a dialog box showing the script to make changes in the database. Accept the changes, and your website database will create the table UserDetails.
4. Configuring the Web.config file
In this step, we will configure the Web.config file to let our ASP.NET website project connect with the SQL database.
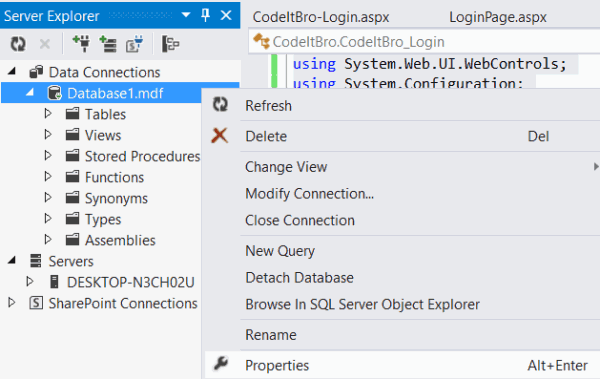
Before configuring the Web.config file, you need to copy the connection string of your SQL database.
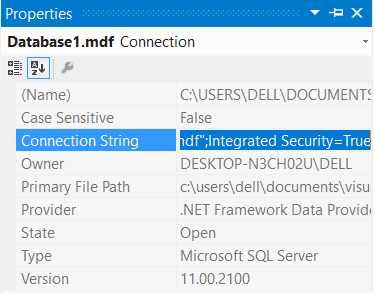
To do this, go to the properties of your database in the Server Explorer, as shown in the screenshot below.
Your connection string will resemble this.
Data Source=(LocalDB)\v11.0;AttachDbFilename="c:\users\dell\documents\visual studio 2012\Projects\CodeItBro\CodeItBro\App_Data\Database1.mdf";Integrated Security=True
Now, add the code below to your Web.config file. Add this code between <configuration></configuration> tag.
<connectionStrings>
    <add name="dbconnection" connectionString="Paste Your Connection String"/>
</connectionStrings>
After adding this code, you can move on to the next step to write the logic for your login page.
5. Coding the ASP.NET login form
Double-click on the Login button (on the Design tab) to open the C# file of your Login page. Now, add these namespaces to your C# code.
using System.Configuration;
using System.Data;
using System.Data.SqlClient;
After adding these namespaces, add the code below inside the scope of protected void Button1_Click(object sender, EventArgs e).
SqlConnection con = new SqlConnection(ConfigurationManager.ConnectionStrings["dbconnection"].ConnectionString);
            con.Open();
            SqlCommand cmd = new SqlCommand("select * from UserDetails where Email =@Email and Password=@Password", con);
            cmd.Parameters.AddWithValue("@Email", TextBox1.Text);
            cmd.Parameters.AddWithValue("@Password", TextBox2.Text);
            SqlDataAdapter da = new SqlDataAdapter(cmd);
            DataTable dt = new DataTable();
            da.Fill(dt);
            if (dt.Rows.Count > 0)
            {

                Response.Redirect("LoginPage.aspx");

            }

            else
            {

                Label3.Visible = true;
                Label3.Text = "Wrong Details";
            }
Do note that Button1 is the ID of your login button, and if you have changed the button ID, the function’s name will change accordingly.
In this code, we create an SQL query and pass the user’s entered values, i.e., Email and Password, to see whether that record exists in the UserDetails table.
Users will be redirected to the specified web page if that record exists. If not, they will see an error message in the GIF above this tutorial.
Final Words
By following these steps in this tutorial, you will better understand how a login page works in ASP.NET using the SQL Server database.
If you have any doubts regarding the steps, please email codeitbro@gmail.com or leave a comment. I will do my best to assist you in any way I can. 🙂